-
Avocado, Fennel, & Shaved Red Onion Salad
There are endless fad diets you can follow, and depending on who you talk to, each person has their own idea of which works best, but let’s face it- most of these diet plans are pricey, difficult to follow, or lack in realistic long term commitment, which could backfire in the end.

Personally, I have always been a firm believer in a “well- rounded” diet and eat the “not so good for you” options in moderation so I can still enjoy what I am in the mood for, had leftover in the house, looked fresh in the grocery store, or had great reviews on the menu of a restaurant I am dining in.
In allowing myself the luxury of eating a heavier meal on occasion, I do my best to combat my cravings for the remainder of that day or the next with something a bit lighter, and so, I always have my eyes and ears open for light lunch recipes that rise above the basic and monotonous tossed green salad (grilled chicken optional).
One recipe I have found to be light, satisfying, and delicious is my Avocado, Fennel, & Shaved Red Onion Salad, which is perfect this time of year when Avocados are ripe and often times on-sale.
The best part of this recipe is that the ingredients lend themselves to a homemade guacamole, which is a perfect way to re-purpose any leftovers. Simply mash the avocado, lemon juice, and red onion with fresh cilantro, salt, pepper, crushed chili flakes, and a touch of blended oil and you are all set with your dip. Just add salt-free corn chips or fresh vegetable sticks for a fresh, nutritious, and healthy snack!
Avocado, Fennel, & Shaved Red Onion Salad
Prep Time 15 minutesServings 4Ingredients
- 4 Ripe Avocados Pitted and Sliced Lengthwise into 1/2 Inch Pieces
- 1 Fennel Bulb Cored and Sliced Thinly
- 1/4 Red Onion Shaved Thinly
- 1/4 Fresh Lemon Juice From
- 1/4 Cup Blended Oil (Olive/Canola Blend)
- 2 Cups Baby Spinach Leaves
- Salt & Pepper To Taste
Instructions
-
Remove stalk from Fennel and remove outer layer, cut in half and remove core from the bottom of the plant. Slice thinly and add to a mixing bowl
-
Remove ends and outer layer from the red onion and cut in half. Cut in half a second time and make small shaved knife cuts. Add 1/4 of the onion to your mixing bowl
-
Cut Avocado in half and remove pit. Cut each side into 1/2 inch slices and add to a mixing bowl (try to handle the avocado as little as possible to avoid a mushy final product)
-
Drizzle oil, lemon juice, salt, and pepper over the main ingredients and gently toss together until well combined. Taste for seasonings or additonal lemon juice. Serve room temperature over a bed of Baby Spinach
-
Scallops with Roasted Fennel & Spring Peas

Mid-March. The time of year when one day the weather is in the 20’s and the next it’s in the 70’s. The anticipation of Spring and Summer grows significantly around this time and so does the appetite for lighter, fresher meals. These Scallops with Roasted Fennel & Spring Peas definitely hits the mark and are perfect for a simple at home date night or luncheon with the girls.
To make this dish, you will need just a handful of simple ingredients- Scallops, Bacon, Fennel, Shallot, Garlic, Spring Peas, Olive Oil, Parsley, & Fresh Mint.
From start to finish, this dish is ready within a half hour and ready to serve. This recipe can also be easily modified to a great “Friday” meal for those of you observing Lent and avoiding meats by simply removing the bacon and replacing the bacon fat with a tablespoon or so of butter (or Olive Oil if you’re watching your waistline!).
Scallops with Roasted Fennel & Spring Peas
Prep Time 10 minutesCook Time 20 minutesTotal Time 30 minutesServings 2Ingredients
- 10 Sea Scallops Side Muscle Removed
- 1 Bulb Fennel Trimmed and Sliced
- 1 Shallot Sliced
- 3 Cloves Fresh Garlic Unpeeled
- 1 Bag Frozen Spring Peas
- 3-4 Strips Bacon
- 4 TBSP Olive Oil
- 4 Leaves Fresh Mint Chiffonade
- 1 TSP Fresh Parsley Chopped
- Salt & Pepper To Taste
Instructions
-
Pre-heat oven to 425 Degrees. Remove peas from the freezer to begin thawing.
In a small baking dish, add sliced shallots, fennel, and garlic cloves (peel on) and coat with 2 TBSP olive oil, salt and pepper. Roast in oven for approximately 20 minutes, stirring occasionally until lightly roasted and golden brown.
While the fennel mixture is roasting in the oven, gently rinse the Scallops and remove any side muscle still attached. Transfer scallops onto a paper towel and pat dry. The scallops must be completely dry prior to searing or they will not develop the golden brown outer crust you are looking to achieve.
In a frying pan, sear the scallops in remaining 2 TBSP of Olive Oil for approximately 3 minutes per side or until golden brown crust has begun to appear. It is important not to overcrowd the pan or the scallops will steam instead of crisping up on the edges. As the scallops finish, transfer them onto a paper towel lined plate for later.
Using the same frying pan, add in slices of bacon and cook until fat has rendered out and bacon is crisp. Remove bacon and chop up for later topping.
Add peas to the frying pan with the bacon fat and cook until completely defrosted and vibrant green in color. Season with salt & pepper.
Pull roasted fennel mixture out of the oven, remove garlic cloves, and add into the sauteed peas with about half of the chopped bacon, fresh parsley, and fresh mint. Toss together for another minute until well combined.
Transfer Pea mixture into a serving dish and top with scallops, remaining bacon, and fresh herbs to garnish. Serve warm-room temp.
-
Beer Braised Pork Tacos
I LOVE Spanish food. I could eat it everyday.
While admittedly I don’t cook it at home often, when I do have some extra time on my hands and leftover odds and ends in the house needing to be used up before spoiling, this is a go-to (and quite simple) recipe to throw together. And the best part? The Crock Pot does all the hard work.

This meal can feed an ARMY for under $12.00-$15.00, which is a great way to stretch a buck and can be a great healthy alternative for anyone sick of meal prepping the standard “grilled chicken and veggies” a week in advance while trying to be mindful of their calorie intake. This meal is light, fresh, AND good for you.
Authentic folks typically spice rub and sear their Pork shoulder on all sides, then braise in the oven on low heat for 4-6 hours, which is arguably the best way, but for those of you (like me) who appreciate only dirtying one pot at a time, the crock pot is a great alternative- and let’s face it- you can basically put a flip flop in a crock pot and it’ll come out fantastic.
This dish is so satisfying and delicious, you may just pass on Chipotle next time around and make your own “Carnitas” in the comfort of your own home, but for those of us who are crunched for time, a simple pan sauteed chicken, ground beef/turkey, or shrimp will do just fine as well.
Beer Braised Pork Tacos
Prep Time 10 minutesCook Time 7 hours 50 minutesTotal Time 8 hoursServings 6Ingredients
- 4 LB Pork Shoulder Bone In/Skin On
- 12 oz Can/Bottle of Beer Lager
- 16 oz Chicken Stock/Broth
- 16 oz Coca Cola
- 3 Piquillo Peppers From Jar
- 1 Small Yellow Onion
- 8 Cloves Fresh Garlic Smashed
- 1 Pablano Pepper Rough Chopped
- 6 Mini Red Potatoes Quartered
- 1 Packet Sazon Seasoning
- 3 Bay Leaves
- 1/2 TBSP Paprika
- 1/2 TSP Black Pepper
- 1/2 TSP Ground White Pepper
- 1 TSP Kosher Salt
- 1/2 TSP Onion Powder
- 1/2 TSP Garlic Powder
- 1/2 TSP Cumin
- 1/4 Bunch Fresh Cilantro
- 1 Pkg Corn or Flour Tortillas
Instructions
-
Season pork shoulder on all sides with salt & coarse ground black pepper and place into crockpot.
In a mixing bowl, combine all dry spices and use a fork/spoon to combine.
Add the beer, cola, chicken stock, peppers, onions, garlic, potatoes, & cilantro and whisk together until well blended.
Pour mixture over the pork and turn heat to the “high” setting
Leave crockpot on high for the first 4 hours and for the remaining 3-4 hours, turn heat down to the “low” setting until fork tender.
Remove any excess fat, skin, and bone (which should slide off easily) and remove the pork to shred. Strain out the vegetables and reserve the remaining cooking liquid.
Add shredded pork into a serving dish and pour over some of the cooking liquid to enhance flavor and keep moist.
CORN TORTILLAS
Warm store-bought yellow Corn Tortillas through by dipping them in water and laying them onto a non-stick pan over high heat for about 45 seconds or so until they release and begin to char. Layer tortillas onto a kitchen towel, wrapping the towel around them to steam as you go.
Line taco shells with shredded pork and top off with pickled red onion, pico de gallo, queso blanco, fresh cilantro, and sliced jalapenos. Enjoy!
-
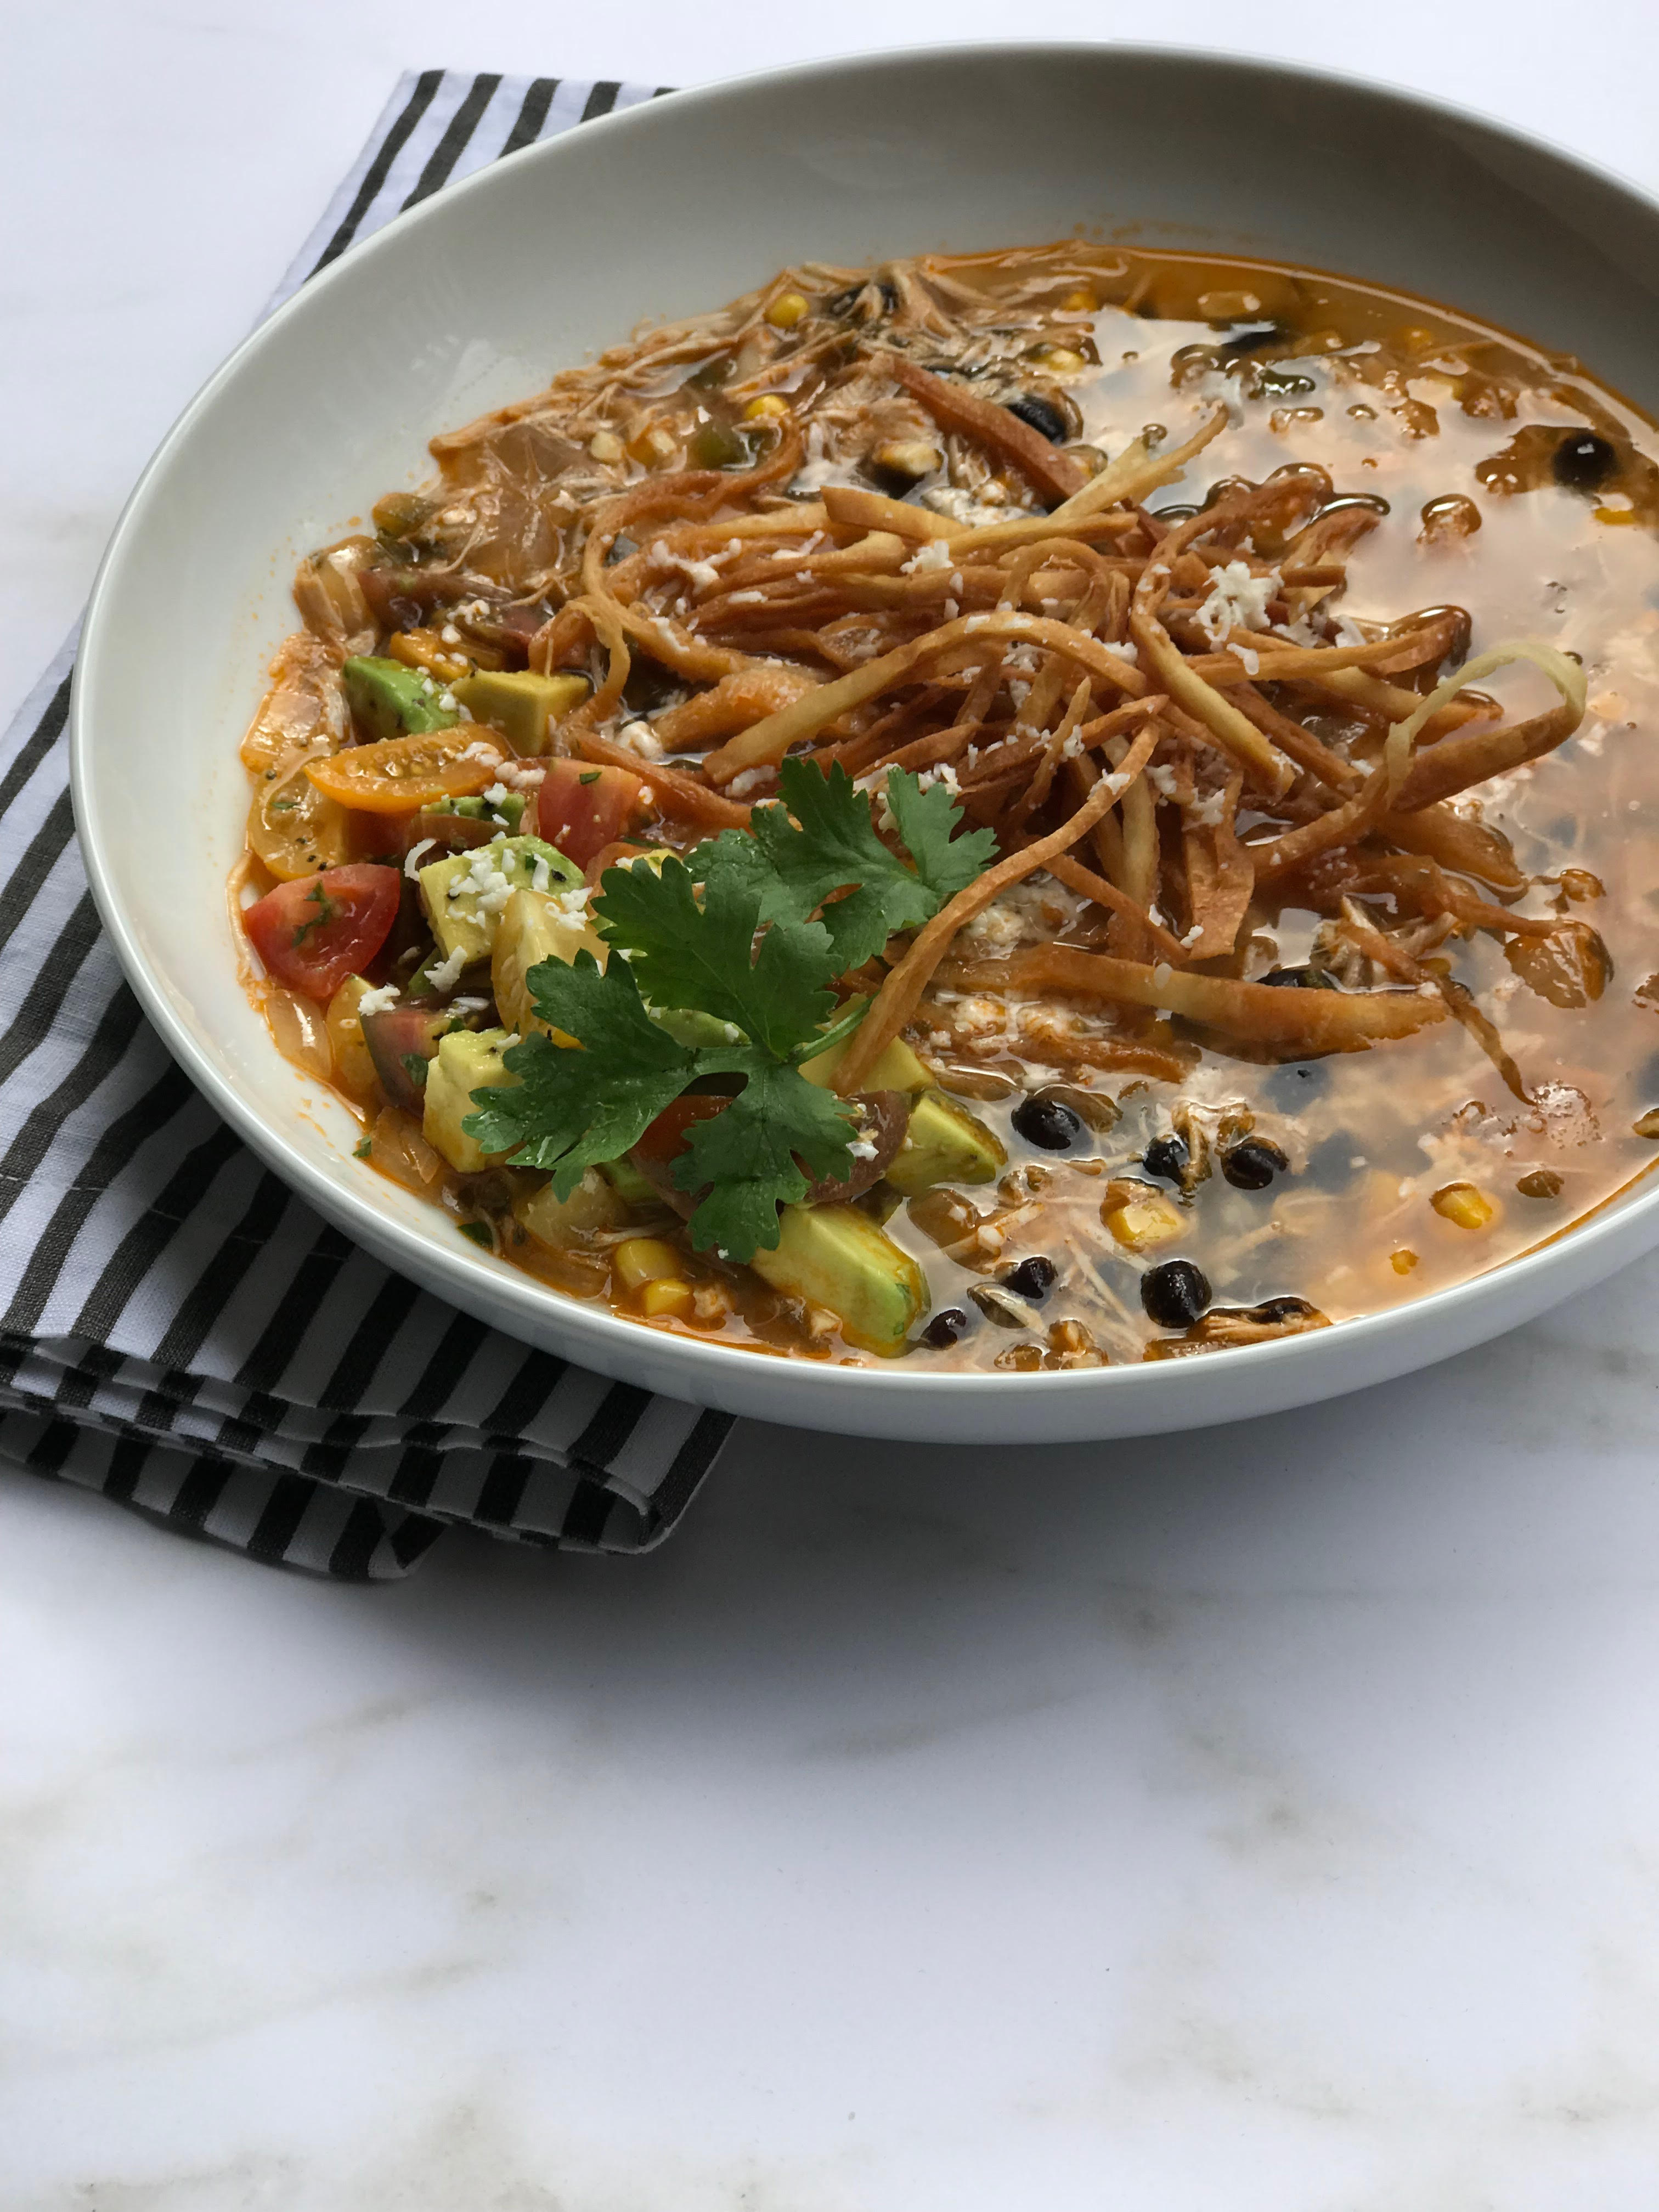
Chicken Tortilla Soup
There is just something about a big bowl of Chicken Tortilla Soup that is irresistible.

What’s not to love?!

The ever familiar notes of
a good chicken soup infused with the essence of Mexican flavors is a match made in heaven and hits the mark on many different levels.Between the zesty lime juice, fresh cilantro, slightly spicy jalapeno pepper, sweet yellow corn and creamy black beans, this is a dish you will be making over and over again all throughout the Fall and Winter seasons.
Top off with home made crispy tortilla strips, cilantro, Cotija cheese, and a fresh salad of heirloom tomato and avocado to tie it all together.
Chicken Tortilla Soup2018-09-26 09:19:38PrintIngredients- 1/2 Cup Olive Oil
- 1 Rotisserie Chicken, Shredded (breast meat only)
- 1 Jalapeno Pepper- Diced (seeds removed)
- 1 Medium Yellow Onion- Diced
- 4 Cloves of Fresh Garlic (smashed and finely chopped)
- 1 1/2 QT Water
- 5 Chicken Bouillon Cubes
- 1 TBSP Tomato Paste
- 2 Bay Leaves
- Lime Juice (1/2 lime fresh squeezed)
- 1 TBSP Fresh Cilantro (plus more for topping)
- 1/2 Can Black Beans (drained and rinsed)
- 1/2 Can Whole Kernel Corn- No Salt (drained)
- Paprika, Salt, & Pepper (to taste)
- 1 TSP Cotija Cheese- Crumbled (for topping)
- 3 Flour Tortillas- Thinly Sliced and Fried (for topping)
Instructions- Heat 1/4 cup of olive oil in a stock pot or cast iron dutch oven and toss in onions, garlic, and jalapeno pepper. Sweat down for 3-4 minutes or until onions have softened. Stir in shredded chicken and black beans, stirring until well combined.
- Pour water over mixture and add bouillon cubes, tomato paste, bay leaves, & fresh lime juice. Stir. Cover partially with lid and let simmer for 35 minutes.
- In a separate saute pan, heat remaining 1/4 cup of olive oil and toss in tortilla strips- stirring continuously with a pair of tongs until golden brown on all sides. Remove from hot oil onto a paper towel lined plate and set aside for later topping.
- Add fresh cilantro, salt, pepper, & Paprika to the soup to your liking. Add corn and stir. Place lid back on soup and cook for an additional 10-15 minutes.
- Ladle soup into bowls and top off with crispy tortilla strips, fresh cilantro, Cotija cheese, and serve.
saristotle https://saristotle.com/ -
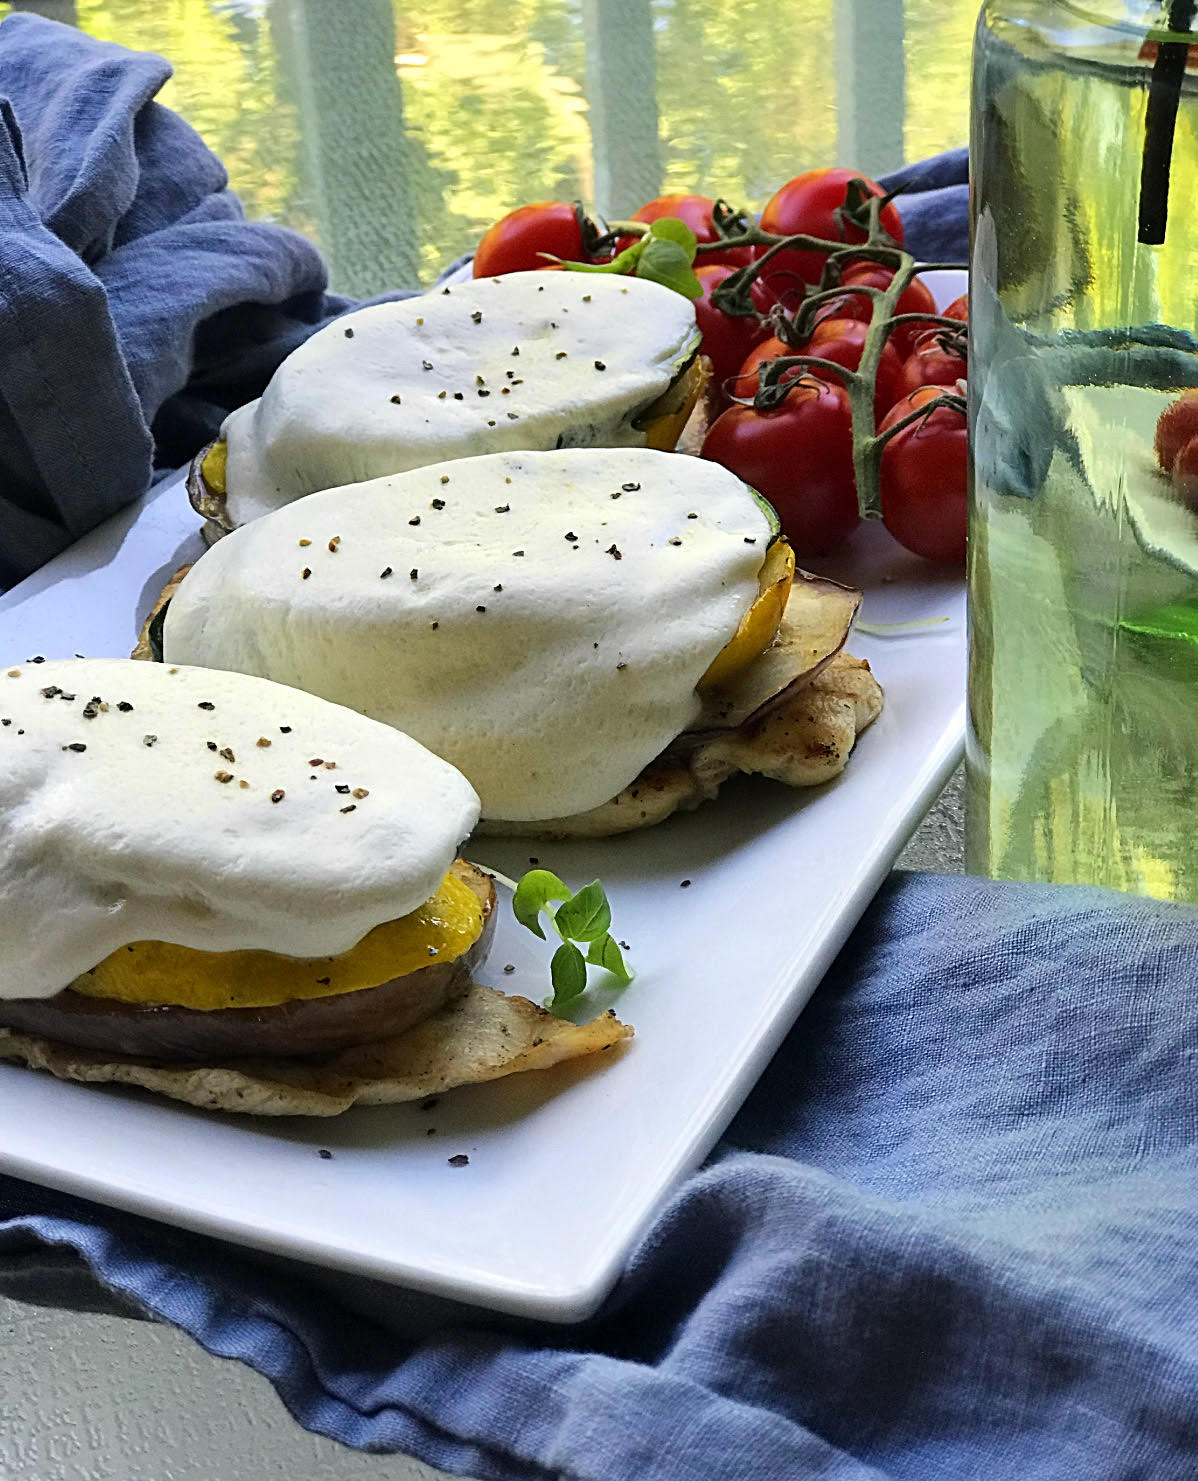
Chicken Napoleon
 My first “real” job out of college was doing weddings and social events for a banquet hall in Central New Jersey. One of the “perks” of this job was having our executive chef cook a staff lunch at the venue each day. While everything he made was exceptional and highly anticipated, the one dish I could never get enough of was his Chicken Napoleon.
The grilled Eggplant, Zucchini, Yellow Squash, and Chicken breasts stacked atop each other, capped with melted Fresh Mozzarella was just so incredibly fresh and satisfying. Finding a balance of healthy and delicious is a rarity, which makes this dish a staple in my house.
When I left that job for a new opportunity in 2015, I was determined to make my own version of the recipe so I could continue to enjoy it for years to come. Fast forward to 2018 and I remain in the business of catering. While my wealth of knowledge and introduction to new foods has increased over the years, this is still one of my favorite “go-to” dinner options and I know you will enjoy it as much as I do!
Chicken Napoleon2018-06-14 18:08:48PrintIngredients- 6 Chicken Breasts, Thin Sliced
- 2 Yellow Squash
- 2 Zucchini
- 1 Large Eggplant
- 1 Ball of Fresh Mozzarella
- 1 Cup Chicken or Vegetable Stock
- Olive Oil, Salt, Pepper, & Garlic Powder (for seasoning)
- Nonstick Cooking Spray
Instructions- Preheat grill (to approximately 425-450 degrees for best grill marks)
- Preheat oven to 350 degrees
- Cut vegetables (skin on) into approx 1 inch thick slices, on a bias (diagonal cut rather than round disks) for a larger surface area.
- Toss the vegetables into a mixing bowl and coat with olive oil, salt, pepper, and garlic powder. Clean chicken breasts in cold water and dry with a paper towel. Season with salt and pepper. Set aside.
- Slice fresh mozzarella into 3/4 inch thick slices- one slice per chicken breast and set aside.
- Spray grill with nonstick cooking spray and add vegetables, cooking for approximately 2 minutes per side until grill marks appear, but still remain "al dente."
- Once vegetables are removed from the grill, coat with fresh cooking spray and add the chicken. Cook for approximately 4-5 minutes per side or until fully cooked through.
- Add stock to the bottom of a 10x15 glass baking dish to prevent sticking and drying out. Lay chicken breasts on the bottom of the dish and stack the eggplant, zucchini, and squash slices (one per piece of chicken). Top with a medallion of fresh mozzarella and place into hot oven.
- Cook for approximately 8-10 minutes or until cheese has melted, but not browned.
- Serve hot.
Adapted from Executive Chef Michael GonzalesAdapted from Executive Chef Michael Gonzalessaristotle https://saristotle.com/