-
Campanelle with Sausage & Broccoli Rabe
Its Sunday…so that means pasta, right?

One of the staples in our house is Sausage with Broccoli Rabe. This is one of the most traditional Italian meals with several variations.
I make this many ways, whether it be switching up the type of pasta, using spicy sausage instead of sweet, or even using Turkey Sausage for a leaner dish. Other times, I will substitute the pasta for Cannellini Beans.
Overall, this preparation is one of the easiest and most delicious so it’s the one I’ve chosen to share with all of you!
 It can be adapted into several other forms, but once you have the basic technique down, it is always a crowd- pleaser.
 What you’ll need: There seems to be hundreds of options in the grocery store as far as which brand, type of meat, or seasoning, but I tend to stick to a basic “Sweet (or Spicy) Italian Pork Sausage,” which has a nice bite to it, and great flavor. It also produces a decent amount of fat renderings, which is vital in getting a depth of flavor into the finished dish.
You will also need a fresh bunch of Broccoli Rabe, Chicken Stock, Fresh Garlic, and some type of short-cut pasta (I typically use either Campanelle, Mezze Rigatoni, or Orecchiette).
Once you have your basic ingredients in hand and ready to go, it’ll only be approximately 15-20 minutes before you have a dish your guests are sure to love.
Check out the recipe below:
Campanelle with Sausage & Broccoli Rabe2018-04-08 17:33:31PrintIngredients- Sweet (or Spicy) Italian Pork Sausage (one small pack, 6 links)
- Broccoli Rabe- 1 Bunch
- 1/2 LB Campanelle Pasta (or pasta of your choice)
- 1/2 Cup Starchy Cooking Water
- 1/2 Cup Chicken Stock
- 4 Cloves Fresh Garlic
- 1 TBSP Butter
- 1/4 Cup Extra Virgin Olive Oil
- Hot Pepper Flakes (optional)
- Salt & Pepper (to taste)
Instructions- Boil a small/medium pot of water. Rinse, and trim broccoli rabe (about 3-4 inches of thick stalk) and remove any outer leaves. Cut into approx. 1 inch segments, and blanch in boiling water for approximately 2 minutes. Remove and shock under cold water to discontinue the cooking process- set aside. Smash and chop fresh garlic. Set aside.
- Boil a second medium pot with salted water. Add pasta and cook until just under "al dente." Before draining, reserve 1/2 cup of the starchy water.
- Remove casings from sausage and place into a (hot) frying pan- using a wooden spoon to break up into small, bite-sized pieces. Stir occasionally until sausage is cooked through, caramelized, and crispy on the outside. Once cooked through, remove with a slotted spoon and transfer onto a paper towel lined plate/bowl.
- In the same pan (with the fat renderings from the sausage), add fresh olive oil and garlic. Stir for approximately one minute and add a few shakes of red pepper flakes. When garlic has begun to brown, add butter. After the butter melts down- add in the starchy water and chicken stock. Bring to a simmer. Add back in the broccoli rabe, sausage, and pasta.
- Season with salt & pepper and continue cooking until the pasta and the broccoli rabe is "al dente," approximately 2 minutes.
saristotle https://saristotle.com/ -
Scallops with Fennel & Blood Orange
About a year ago, I stumbled upon a restaurant called “The Tewksbury Inn” and ordered an entree I knew I would need to come home and attempt to re-create.

With just a handful of simple ingredients, this recipe is not only delicious but it is SO easy to prepare- even for a beginner, and takes practically no time at all to put together!
With Blood Oranges in season, this makes for a perfect light dinner or party hors d’ oeuvre that you and your family and/or friends will love.
The best part of this dish is how it has the effect of appearing like you’ve worked very hard to prepare it, when in reality it took only a few short minutes.
Seared scallops work beautifully as a vehicle for the sweet and tart dressing and the fennel ties it all together as a well-composed dish.
This recipe, without question, will become an instant favorite!
Scallops with Fennel & Blood Orange2018-04-07 14:18:36PrintIngredients- Scallops (10-12)- Muscle Removed
- Blood Oranges (2)
- Fennel- 1 Small Bulb
- 1 TBSP White Wine
- Extra Virgin Olive Oil
- Salt & Pepper (to taste)
Instructions- Cut top & bottoms off of one Blood Orange and remove outer skin/white membrane. Cut segments out of the orange and set aside for later plating. Core the Fennel and slice into thin strips.
- Rinse Scallops and pat (very) dry with a paper towel. Season with salt & pepper. In a medium frying pan with Olive Oil, sear the Scallops (approx 2-3 minutes per side- depending on size). Set aside under aluminum foil to finish cooking through.
- In a new frying pan, add Olive Oil. Once hot, add Fennel and toss for a minute. Add the splash of white wine and squeeze the juice from the remaining orange into the pan. Bring to a simmer (2-3 minutes) and remove from heat.
- Begin plating the Scallops and Blood Orange segments. Place Fennel around the dish and drizzle with pan jus. Serve ambient.
saristotle https://saristotle.com/ -
Old World Pasta Fagioli
Its “Good Friday,” which means its the last day of Lent and abstaining from meat on Fridays for many. If you’re getting tired of ordering Pizza, this Pasta Fagioli recipe is so easy and flavorful, only requiring a handful of ingredients that you might just have on-hand.

This serves as the perfect light-but-satisfying lunch or dinner for any bitter cold or rainy day. With “comfort” food season coming to a close, we have to enjoy these dishes while we still have the chance!
This Pasta Fagioli is a go-to recipe to keep on file for nights when you are running low on groceries but still long for a home cooked, thoughtful meal.
While this soup will seldomly go to waste, if you find yourself with any leftovers, or are crunched for time and prefer to double your recipes for later use, it can be easily frozen and brought back up to temperature for several months after the initial preparation.
Old World Pasta Fagioli2018-03-30 16:56:32PrintIngredients- 2 15oz Cans of Small White Beans
- 1 32oz Box of Chicken Broth (see noted)
- 1/3 Box of Ditalini Pasta
- 1 Shallot
- 4 Cloves of Garlic
- 4 Stalks Celery Hearts
- Rind from Reggiano Parmesan
- 1/4 Cup Extra Virgin Olive Oil
- 4 Leaves Fresh Basil
- 2 TBSP Tomato Sauce
- Salt & Pepper, & Red Pepper Flakes to Taste
Instructions- In a colander, empty both cans of white beans and rinse through with water. Using hands, mash about 1/2 of the beans and leave the other half whole. Set aside. Cut celery stalks into 3 smaller strips and small dice. Small dice shallots. Peel garlic and leave the cloves whole. In a large Stock Pot or Dutch Oven, heat over a medium flame & add EVOO. Once the oil is hot, add celery, garlic, & shallots and saute, stirring often until sweated down. Add in a (light) shake of red pepper flakes and the white beans- coating well. Add in the whole box of chicken stock and the Parmesan rinds (can also add a cup of water, optional, to stretch the broth further). Add tomato sauce (broth should be a light pink in color). Lower flame and simmer (partially covered) on low for an hour. Add fresh basil and pasta into the stock pot and stir. Turn off flame so pasta will not overcook. Once the pasta is "al dente," the soup is ready to serve. Remove the whole garlic cloves and Parmesan rinds. Top with cracked black pepper & fresh Parmesan cheese.
Notes- **I prefer College Inn Chicken Stock/Broth for each of my recipes when required
- **Do not add seasonings in until the end to keep the beans tender
saristotle https://saristotle.com/ -
Breakfast Poutine with Sausage Gravy
Who doesn’t love french fries…with practically anything on them? Fries serve as a perfect vehicle for all sorts of spreads, dips, cheeses, etc.- so why not for breakfast?! This Breakfast Poutine with Sausage Gravy is the ultimate unique option for anyone looking for a brunch alternative.

Once in a while, we have to allow ourselves to indulge and my ULTIMATE weakness is a good french fry. Of course, you can never go wrong with the typical breakfast staples, but every so often, it is refreshing to see the ingredients we all know and love used in an unconventional way.
This recipe is definitely a self- indulging one, but delicious nonetheless. Next time you are in need of something a little different for breakfast or brunch, this is the ultimate go-to and tastes even better than it looks, so run- don’t walk(!) to the grocery store, pick up these few simple ingredients (most of which, you already have in the house), and make this dish. You will not regret it!
Breakfast Poutine with Sausage Gravy2018-03-21 16:04:41PrintHAND CUT DOUBLE FRIED FRENCH FRIES- 3 Large Russet Potatoes (washed- Julienne cut)
- Vegetable Oil (in medium/large saucepot)
- Salt
SAUSAGE GRAVY- 1/2 Pound Sweet Italian Pork Sausage- Casing removed (3-4 links)
- 1/4 Red Bell Pepper (small diced)
- 3 TBSP Butter
- 1/4 Cup All Purpose Flour
- 3 Cups Whole Milk
- 1 TBSP Maple Syrup
- 1/2 Tsp Fresh Sage
- 1/2 Tsp Fresh Parsley
- 1/2 Tsp Chopped Chives
- Kosher Salt & Black Pepper (to taste)
FRIED EGG- 1 Farm Egg
- 1 TSP Butter
Instructions- Preheat a medium/large saucepot with vegetable oil. Cut russet potatoes into evenly sized strips. Once the oil has reached 350-375 degrees, drop the fries and cook until light golden brown and remove. While batches of fries are cooking (see notes), remove sausage casings and cook until golden brown and crumbled (breaking up with a wooden spoon as it cooks). Once sausage is near browning, toss in the diced red bell pepper and maple syrup. Cook until pepper is cooked through and sausage has good color (stirring often to avoid burning from the sugar in the maple syrup). Once cooked through, add butter and flour and stir for 2-3 minutes. Add milk (1 cup at a time) until the right consistency is reached. Add sage, parsley, salt, & pepper and keep on a low flame until dish is ready to serve- stirring occasionally.
- While the gravy is cooking, add fries back into the hot oil to fry a second time until they become a darker golden brown and crispy. Remove from oil, toss with salt, and set onto a serving dish. In a small non-stick pan over medium heat, melt 1 tsp of butter and add a fresh egg once the butter has melted (crack egg into a bowl first to be sure the yolk doesn't break before placing it into the pan). Partially cover the pan with the egg so the clear liquid steams and cooks through without flipping. Once the egg is finished, ladle sausage gravy onto the hand cut fries and top with the fried egg, black pepper, & chives. Serve hot.
Notes- *Cook fries in small batches to avoid sticking or overcrowding the pot
- *Save time by using store bought fries from the frozen food section of your local grocery store.
saristotle https://saristotle.com/ -
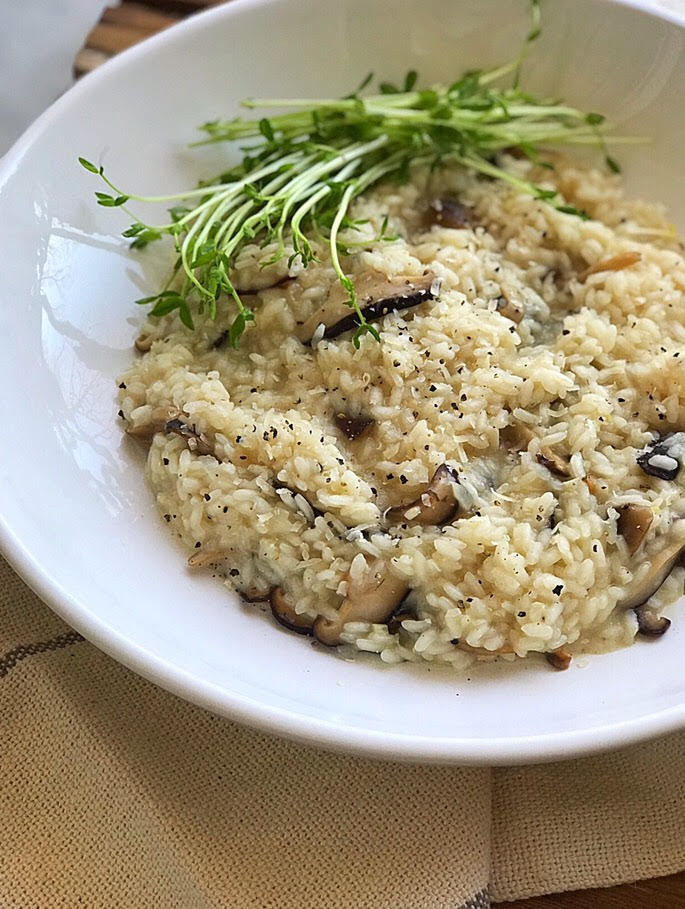
Wild Mushroom Risotto
One of the most essential comfort foods any cook should have in their recipe box is a good Risotto. Risotto can be used as an accompaniment for other entree items like chicken and seafood or be served as an entree in and of itself

Risotto is one of the most versatile dishes out there because of it’s endless variations. While this item is often ordered from restaurant menus and thought of as a “gourmet” meal, many don’t realize how simple it is to make in the comfort of their own homes.
A common misconception surrounding this dish is that it is difficult to make and requires constant attention, however, only half of that statement is true. YES– Risotto does require constant attention throughout the cooking process, but as long as you don’t mind standing at your stovetop, the technique of preparing this is actually quite simple, even for a beginner, and is a good arm workout to boot.
It’s always good to have Arborio rice in the house, seeing as the remainder of the necessary ingredients are things you probably already have on hand. This dish really only requires a handful of basic ingredients to pull together. You will need olive oil, garlic, shallots (or yellow onion), Parmesan cheese, white wine, butter, your preference of stock (chicken, veggie, seafood, etc.), heavy cream, and of course, the Arborio rice.

Undoubtedly, there are variations of this dish that are far more upscale and elaborate, but for the home cook, this recipe is simple, delicious, and will not disappoint.
This is one of those dinners that’ll leave your guests thinking you put much more time and effort into preparing.
LEFTOVER HACK: Chill/slightly freeze any leftover Risotto until it can be easily formed into little balls (use an ice cream scooper for even portions) and dredge in flour, egg, and Panko breadcrumbs. If you have access to a deep fryer, fully submerging the Risotto balls is the best method for quick and even cooking, however, if you do not, shallow frying them on all sides in a skillet with Olive oil, turning every minute or two until golden brown also works great. Serve with a simple Marinara or Vodka sauce & enjoy!
Wild Mushroom Risotto2018-03-18 21:22:21PrintIngredients- 2 Packs of Wild or Baby Bella Mushrooms (sliced)
- 18oz of Arborio Rice
- 3 Garlic Cloves (smashed & minced)
- 2 Shallots or 1 Small Yellow Onion (fine diced)
- 2 TBSP Butter
- 1/4 Cup Extra Virgin Olive Oil
- 1/2 Cup Dry White Wine
- 2 32oz Boxes of Chicken Stock/Broth (warmed through)
- 1/4 Cup Heavy Cream
- 1/2 Cup Reggiano Parmigiano Cheese
- Cracked Black Pepper & Salt (to taste)
Instructions- In a saucepan, add chicken stock and warm through over a medium flame (see notes). Wash and trim wild mushroom mix and cut down into bite sized pieces. Heat 1/4 cup EVOO over medium heat in a large silver or dutch oven pot. Toss in the garlic & shallots and sauté until lightly caramelized and deglaze with the white wine. Cook down for 2-3 minutes and add butter.
- When the butter melts, add mushrooms and cook down for 5-6 minutes, stirring often, until mostly cooked through. To the same pot, add Arborio rice and coat well. Lightly toast the rice in a frying pan (approximately 1 minute) and begin to ladle in chicken stock 1 cup at a time until the rice absorbs the liquid, stirring continuously for approximately 20 minutes until nearly cooked through. Add heavy cream Parmesan cheese, salt, & pepper. Continue cooking for approximately 5-10 more minutes or until rice is "al dente," adding more chicken stock if needed.
Notes- *Using hot chicken stock instead of cold/room temperature will help to achieve faster and more even cooking
saristotle https://saristotle.com/ -
Toasted Israeli Couscous Salad with Roasted Vegetables
Couscous is a Mediterranean staple that can stand on its own, be paired as a side for various chicken, fish, or plant-based dishes, made into salads, and even used in soups or stews.

There are a few variations of Couscous to choose from and depending on the recipe, certain types will work better than others. Moroccan Couscous (tiny granules) and Israeli Couscous (larger “pearls”) are the two most common.
This recipe features one of my favorite preparations, which is toasted and used as the base for a simple and delicious side salad. Adding sweet roasted vegetables brings a depth of flavor, which the couscous needs since it does not have a strong taste of its own.
Personally, I prefer the texture of Israeli Couscous over Moroccan, so I tend to use that more often. Lightly toasting the pearls in a frying pan before boiling them is a key step to making sure the Couscous packs a ton of nutty flavor. This recipe will become one of your “go to” side dishes since it goes so well on any menu year round.
Toasted Israeli Couscous Salad with Roasted Vegetables2018-03-18 13:37:03PrintIngredients- 2 Cups Israeli "Pearl" Couscous (toasted)
- 1/4 Cup Extra Virgin Olive Oil
- 6 Stalks of Asparagus
- 1 Red Bell Pepper
- 1/2 Purple Onion
- 1 Zucchini
- 1 Yellow Squash
- 1 Baby Italian Eggplant
- 1 Tbsp Fresh Parsley
- Salt & Pepper (to taste)
TOASTED COUSCOUS- Heat Olive Oil in a frying pan over medium heat. Add Couscous to the pan and lightly toast until golden brown- stirring often to prevent it from burning. While couscous is cooking, boil a pot of water according to package instructions (typically 1 1/4 cups of water for each cup of couscous). Once water has boiled, add 1/2 tsp of salt and toasted Couscous Pearls. Cook for approximately 10 minutes or until the water has been soaked up and the pearls are "al dente." Remove from heat and set aside. Once cooled, toss with chopped parsley, salt, and pepper.
ROASTED VEGETABLES- Preheat oven to 400 degrees. Roughly chop the asparagus, bell pepper, zucchini, squash, onion, & eggplant into bite sized pieces and lay flat on a parchment paper lined sheet tray. Toss with extra virgin olive oil and put into oven for approximately 20-25 minutes- until the vegetables are cooked through and have a light caramelization on them from the oven (stirring once halfway through).
- Add roasted vegetables and cooked Couscous to a mixing bowl and toss together. Platter and serve.
saristotle https://saristotle.com/ -
Citrus Wheel Salad with Frisée & Mache Greens
Although various citrus fruits are available year-round, there is something about this time of year that has me anticipating using it in my cooking more than usual. It brings a brightness and juicy texture to a dish that you just won’t find using other fruits or vegetables. As we are right on the cusp of Spring, there is no better time to introduce some healthier, lighter options back into your diet. Welcome, the Citrus Salad.
This time of year, there are a ton of delicious citrus options in season to choose from in your local grocery store- Tangelos, Cara Cara Oranges, Kumquats, Meyer Lemons, and Blood Oranges are just among a few options you’ll find on the shelves right now, which makes it the perfect time to put together this Citrus Wheel Salad.

Something I am keen on lately is testing new types of salad greens and how they pair with various flavor profiles. I try to get away from the standard Romaine, Leaf Lettuces, Spring/Mesclun Mixes, etc. whenever possible to keep things interesting.
Frisée is always a go-to for me. The bitter flavor and crunchy texture works beautifully in salads, although I do typically like to pair it with another type of green since the bitterness of it can be overpowering.
In this recipe, I used Mache “Rosettes,” which get their name because of their unique shape. Each rosette has several delicate leaves, which are especially eye catching. The Mache Greens have a sweet, nutty flavor profile that work well the additional toppings used in this dish.
Accompanying the citrus and salad greens are beautiful roasted Heirloom Beets, chopped Pistachios, & sliced Fennel. Tie it all together with the light dressing of a delicious home made citrus- dijon vinaigrette.
Citrus Wheel Salad with Frisee & Mache Greens2018-03-13 21:17:41PrintSALAD INGREDIENTS- 3-4 Pieces of Assorted Citrus (see notes below)
- 1 Bulb of Fennel (core removed & sliced thin)
- 2 Small Golden Beets (Roasted)
- 2 Small Red Beets (Roasted)
- 1/4 Cup Chopped Pistachios
CITRUS- DIJON VINAIGRETTE- Zest from 1 Tangelo (or Naval Orange)
- Juice from 1/2 Tangelo (or Naval Orange)
- 1/2 Tsp Dijon Mustard
- 1 Tsp Honey
- 2 Tsp Champagne Vinegar
- 2 Tbsp Extra Virgin Olive Oil
- 1 Tsp Water
- **Can also add Fennel fronds (delicate green leaves at the top of the plant) to this vinaigrette to enhance the Fennel flavor.
InstructionsROASTED BEETS- Preheat oven to 400 degrees. Scrub beets and brush with olive oil. Wrap in aluminum foil and cook for approximately 45 minutes or until fork tender (depending on size). Rub off skins and cut into wedges. Set aside.
SALAD- Cut citrus into round disks and remove peels. Remove the Fennel core and slice thinly, (saving the fronds to later incorporate into the vinaigrette). Rough chop Pistachios. Set aside. Cut Frisee into bite sized pieces- removing the stem and layer with the Mache Greens onto a serving platter. Top with citrus wheels, Beets, Fennel, & Pistachios. Drizzle on vinaigrette and serve right away.
Notes- Citrus Used in this Recipe: Cara Cara Oranges, Navel Oranges, Grapefruit, & Tangelos
saristotle https://saristotle.com/ -
BBQ Pulled Pork Sliders with Pickled Red Onions
Pulled pork is something we all love to eat, but seldom love to make. The main reason? Time. We never seem to have enough of it.
In order to get that perfect, “fall off the bone” consistency, you have to be patient.
Between busy work schedules, running errands, and the many other obligations filling our schedules, it is more attainable to whip up a quick meal than to plan the day around what you’re serving for dinner..but what if we looked at it from a different angle?

While pulled pork does take time to cook, it is quite easy to prepare, and low maintenance. Once it goes into an oven or slow cooker, it’ll go for several hours with no attention necessary, but the real up-side of this particular item is that it truly is the dish that “keeps on giving.” Even a small pork shoulder will yield a sizable final product, which can be used for many different dishes throughout the week, thus- saving you time (and money) in the long run.
Although today’s post is focused on sliders in specific, there are several ways to repurpose the leftovers so you can be sure nothing goes to waste! Grilled cheeses, sandwiches, enchiladas, quesadillas, tacos, & flatbreads are just a handful of ways you can incorporate the pulled pork leftovers into yet another delicious meal.
So let’s get back to the sliders, shall we? These make for the perfect “small bite” hors d’oeuvres when having company over and I assure you they will smell them before they see them. The sweet and smoky BBQ pork will fill any room with a heavenly aroma and immediately get the taste buds tingling. Top the pork with a handful of tangy pickled red onions, serve on miniature hawaiian buns, and you’ve got yourself a delicious appetizer all of your guests (and you) will love!
BBQ Pulled Pork Sliders with Pickled Red Onions2018-03-11 21:48:28PrintSLOW COOKER BBQ PORK- 1 Pork Shoulder (Bone In, 3-5lbs)
- 1 Bottle of your Favorite BBQ Sauce
- 1 Cup Coca Cola or Dr. Pepper Soda
- 1/2 Cup Water (or more if needed to fully submerge the pork)
DRY RUB FOR PORK- 1/4 Cup Brown Sugar
- 1 Tsp Kosher Salt
- 1 Tsp Course Ground Black Pepper
- 1 Tsp Garlic Powder
- 1 Tsp Onion Powder
- 2 Tsp Paprika
PICKLED RED ONIONS- Sliced Red Onion (1)
- 1 Tsp Kosher Salt
- 1/2 Tsp Whole Black Peppercorns
- 2 Tsp Granulated Sugar
- 1/2 Cup Apple Cider Vinegar
- 1/4 Cup Grenadine
- 1/2 Cup Water
SLIDERS- Miniature Kings Hawaiian Buns (12)
- Gherkin Pickles (for topping)
- Skewers (to assemble sliders)
SLOW COOKER BBQ PORK- Combine dry rub ingredients together well. Coat pork shoulder with dry rub on all sides and place into the slow cooker. To the slow cooker, add in BBQ sauce, cola, and water until the pork is covered completely. Set to low and cook for 9-12 hours until it reaches the desired tenderness. Remove bone(s) and any excess fat. Shred with a fork and toss back into cooking liquid to absorb the juices. Remove the pulled pork and drizzle with a bit more of the cooking liquid. Set aside.
PICKLED RED ONIONS- Add Apple Cider Vinegar, Grenadine, water, sugar, peppercorns, & salt to a small pot and bring to a boil. Add onions and cook for 1-2 minutes to soften. Remove from heat and pour directly into a tightly sealed container and refrigerate for several hours or overnight (stays good for several weeks in the refrigerator)
SLIDERS- Halve the slider buns and place bottoms onto serving platter. Top with the pulled pork and pickled red onions. Place the top half of the slider bun onto the onions and skewer the sandwich with the gherkin pickle. Serve room temperature.
Notes- For the pork, I find that "bone-in" pork shoulder, tends to work better than the boneless. It helps to tenderize the pork and further enhances the flavor.
- Some people like to remove excess fat before the cooking process, however, I find that it helps to maintain tenderness, adds flavor, and is easy to remove later, so I say..leave it!
- If you can not find Hawaiian buns, miniature brioche or potato rolls also work as good substitutes, although I find that the soft texture and buttery flavor of the Hawaiian buns work the best for this recipe.
saristotle https://saristotle.com/ -
Avocado Toast with Fresh Chimichurri & Baby Arugula
Who doesn’t love a good Avocado Toast?
This is the perfect “go to” brunch option for me when I am looking for something guilt free, but completely satisfying. While the dish itself has the standard two components- toasted bread & fresh Avocado, there are a ton of variations and ways to prepare this- here’s mine!

I am a big fan of multigrain bread for this particular recipe. It adds a nutty flavor and great texture that really elevates the dish. Pairing this with the creamy Avocado, peppery Arugula, velvety “sunny-side-up” egg, and zesty Chimichurri hits all the marks you are looking for in that perfect bite.
I am all about making my recipe accompaniments ahead of time- especially those that can be used for duel purposes throughout the week. This Chimichurri sauce can be used on a variety of things such as grilled shrimp, steaks, chicken, salads, over vegetables-you name it.
I love making my sauces fresh from scratch and having different uses for the same ingredient is key to making sure none of the delicious product, money spent, or time you put into making it goes to waste.
With the Chimichurri out of the way, the rest of the dish takes (at the most) 10 minutes to prepare- keep this in mind before grabbing that lifeless bowl of cereal and heading out for your morning commute!
Avocado Toast with Fresh Chimichurri & Baby Arugula2018-03-10 00:38:23PrintCHIMICHURRI SAUCE- 1/2 Cup Fresh Cilantro
- 1/2 Cup Fresh Parsley
- 1 Clove Fresh Garlic- Smashed
- 1/4 Cup Diced Red Onion
- Juice from 1/2 Lemon
- Juice from 1/2 Lime
- 1/4 Cup Extra Virgin Olive Oil
- Salt, Pepper, & Red Pepper Flakes (to taste)
AVOCADO SPREAD- 1 Avocado (mashed)
- Salt, Pepper, Garlic Powder, & Red Pepper Flakes (to taste)
TOAST- Sliced Multigrain Bread (toasted)
- Baby Arugula (small handful)
- 1/2 TBSP Butter
- 1 Egg
- Salt & Pepper (to taste)
Instructions- FOR CHIMICHURRI: Combine ingredients together well in a mixing bowl- transfer into a blender or food processor and lightly blend until a smooth (but not creamy).
- FOR TOAST: Lightly toast bread in an oven or toaster. While the bread is toasting, mash together the Avocado in a mixing bowl and fold in the salt, black pepper, garlic powder, & red pepper flakes and set aside. Place a non-stick frying pan over a medium heat until the pan is hot. Add the pad of butter and let melt (but not brown). Once the butter has melted, crack the egg into the pan. After a moment or so, partially cover the pan so the steam can cook the yolk without the bottom becoming overcooked. Once the clear runny liquid has faded, the egg is cooked through and can come off the flame.
- Assemble the finished product by layering on the Avocado spread followed by the Baby Arugula. Top with the fried egg and Chimichurri Sauce. Garnish with fresh cracked black pepper and additional red pepper flakes. Serve warm.
saristotle https://saristotle.com/ -
Greek Quinoa Salad
Its hard to imagine, while looking out our windows to a bitter snowy nor’easter, that Summer (thankfully) is right around the corner. I am always looking for light lunch ideas that are
 guilt free, fresh, & satisfying- especially knowing “sweatshirt” season is coming to a close. A Quinoa salad typically hits that mark, and let’s face it- how many simple salads can we really eat?
 Quinoa is not only a “superfood” packed full of nutrients and health benefits, but since the “ancient grain” is actually a seed, it is also Gluten Free. Since Quinoa is such a versatile ingredient, it takes on the flavors of whatever it is paired with and in this recipe, it goes beautifully with the Greek Flavor profile we all know and love.
The best part of this recipe is that it gets even better as it sits. This means you can make it a day or two in advance, which is a great time saver for anyone with a busy schedule.
Greek Quinoa Salad2018-03-07 12:49:04PrintSALAD- 1 Cup Red Quinoa (will yield 2 cups once cooked)
- 1 15oz Can of Garbanzo Beans (chickpeas), Drained
- Kalamata Olives (12-15 pieces)
- 2 TBSP Red Onion (small diced)
- 1/2 Cup Feta Cheese (crumbled)
- 2 TBSP Fresh Parsley (rough chopped)
- Zest from 1 Lemon
- Salt & Black Pepper (to taste)
VINAIGRETTE- Juice from 1/2 Lemon
- Splash Kalamata Olive Juice
- Splash Red Wine Vinegar
- Splash Water
- Drop of Dijon Mustard (smaller than a dime)
- 1/2 TBSP Honey
- 2 TBSP Extra Virgin Olive Oil
- Black Pepper (to taste)
Instructions- Cook quinoa to package instructions and let cool completely. Add Garbanzo Beans, Kalamata Olives, Red Onion, Feta Cheese, Fresh Parsley, Lemon Zest, & S/P. Combine well. Add dressing over mixture and lightly toss again. Platter & serve or save for later!
Notes- I usually cook the quinoa the night before so it is cooled and ready to prepare. The dressing can be made the day before as well.
saristotle https://saristotle.com/